Start building a successful Shopify store today
Shopify website
creation checklist

We're Shopify experts with over a decade of experience
Let's plan a successful web launch
Your business idea popped in your head, the plan is on the table, and now you’re ready to launch your very own ecommerce store. But where to start?
Navigating the technical lingo might be tricky, and how about user experience and SEO? Eek! It might seem a tad overwhelming.
Spend less time worrying about your website and more time on building your business.
Start ticking off the items from this list so your website’s framework is ready, and you can hand over your prep work to a professional like ourselves. Or you can start tinkering away on your own website. How exciting!
You’ll achieve a great end result and you can be proud of your new baby.
Step 1
Store Setup
- Business name
- Business address
- ABN / Business Registration Number
- Registered for GST (tax) | Yes/No*
- Website URL*
Your URL / domain name – if you don’t have this one registered yet, please check the availability by clicking here. You can purchase a .com.au domain with companies like GoDaddy.
A .com domain is included within your Shopify plan. If you already purchased a .com domain – that’s ok too.
- Domain registration details / logins
- NAME.myshopify.com URL (if you set this up yet)
If you don’t have a store yet, don’t worry! As a Shopify Partner can set one up in our developer’s account. This is our preferred way to work together.
This means we can build your store in the background without a trial or without paying a monthly fee yet. After reviewing the progress, we will send through a Staff Account invite so you can access your store.
Upon finalisation we will initiate a store transfer so you become the store owner. You will then need to select your Shopify plan (usually the $39 USD plan will do) and start paying your monthly fee.
- Business phone number
Note that your phone number will show on the customer’s bank statement as a standard practice for Shopify transactions, this way people can get in touch in case there are issues with the transaction or order. You can however opt to hide your phone number everywhere else.
- Email Address
You can use different email addresses, or the same for all:
1. Customer contact (contact form)
2. Email comms (“From” for order confirmations etc)
3. New order notifications (ie. orders@yourname.com)
4. Shop contact (ie. your personal email to be contacted by Shopify)
Step 2
Backend
- BSB & Account Number / Bank details
Shopify offers a native credit card gateway. This way customers can securely checkout via debit or credit card, Shop Pay, Google Pay or Apple Pay.
You’ll receive payouts directly from Shopify into your nominated bank account.
- Business Structure (sole trader, company, trust)
- Business Owner's Details
If you have multiple owners, please specify this for each owner and add in how much % of the business this person owns.
For each owner you’ll need:
First Name, Last Name, Address, Date of Birth
- Store Currency
- Other Currencies (if applicable)
Note that after your first sale, your main currency is locked in and can’t be changed.
- PayPal logins
- Any other payment methods (if applicable)
- Afterpay integration
If you already have an Afterpay account, please add your Merchant ID and Secret Key.
If you still have to apply for Afterpay, your Afterpay account can only be approved once the store is live, so you’ll need to leave this until later.
- Local delivery and/or pickup details (if applicable)
- Shipping Rates / Table
These can be based on order price or weight and can be different for postcodes, regions or countries. You can also integrate apps such as Auspost, Sendle, Shippit or DHL to link your account for real-time shipping quotes.
If you have a lot or very complex rates then you might be better off opting for an app such as ShipZip.
Step 3
Socials
- Your social media links (IG, FB, TikTok, Pinterest, YouTube)
- Instagram logins to add a live IG feed
- Email marketing platform logins
Shopify’s newsletter signups are stored in the backend, but we strongly recommend signing up for Klaviyo. We can link this and feed your newsletter subscribers into your Klaviyo account.
- Google Account logins to link Google Analytics (GA4)
- Personal Facebook logins
Needed: email address & password for Facebook.
If you want to link your Facebook and Instagram Shop + Meta Ads Pixel then you’ll require to connect the Shopify Facebook App via logging into your profile.
These need to be YOUR personal logins linked to business profile with your business’ FB & Insta pages.
Please note:
- Don’t create “fake” logins, created just for externals to use, because Facebook will flag it the log in attempt and block this person / lock them out.
- You are the owner of your page and Shopify only accepts owners to link this up.
- You cannot make me or anyone else admin of your page as these people are not the owner of your page so the access will be denied within Shopify.
Facebook won’t approve to sell your products on their platforms until your store is live. For this reason, we advice to integrate this part at the very end and after going live. If you link it up prior, you’ll risk a lengthy reviewal process from FB to get it all working.
Also note that Facebook might not approve all the products you are selling (ie. certain words or ingredients are flagged within their policy – such as essential oils). Unfortunately we cannot assist with your appeal. Ultimately this might mean that you cannot sell these products via Facebook & Instagram Shop (they can still be purchased on your website of course!)
Step 4
Design
- Preferred Shopify theme
We highly recommend to only use a Shopify supported theme from the theme store. You can check them out here: https://themes.shopify.com/
This will ensure your website is future-proof and has access to both Shopify and the theme support. Third-party themes are not supported by Shopify so if you run into any issues, Shopify will not be able to help you. Automatic updates are also not available for third-party themes and bugs are more common.
If you’re tossing up if it’s worth the investment to purchase a paid theme, then read my post about Free Vs Paid Shopify Themes here.
A customised store that’s built from scratch means you’ll need a dedicated developer on your site to help with updates, debugging and for the overall maintenance and health of your store.
- 1-3 website examples
- Specific requests, functionalities or integrations (if desired)
- Your logo and brand guide (if you have one)
- Preferred fonts
You can choose 2-3 fonts you like to use from the Shopify Font Library. These are Google web fonts. If your branding fonts aren’t included in this library, then please pick a similar font you like to use or provide your own fonts.
Tip: press CTRL + F to type in your font to search through the font library for availability.
If you want to use your own custom fonts, you’ll need to hold the license for web usage and they need to be .woff, .woff2, .ttf and/or .eot files (no .otf files). We strongly recommend not to use more than 2 custom fonts on your site (for headers + body text / buttons). Note that you’ll need to install the Fontify app or get custom fonts hardcoded at an extra price.
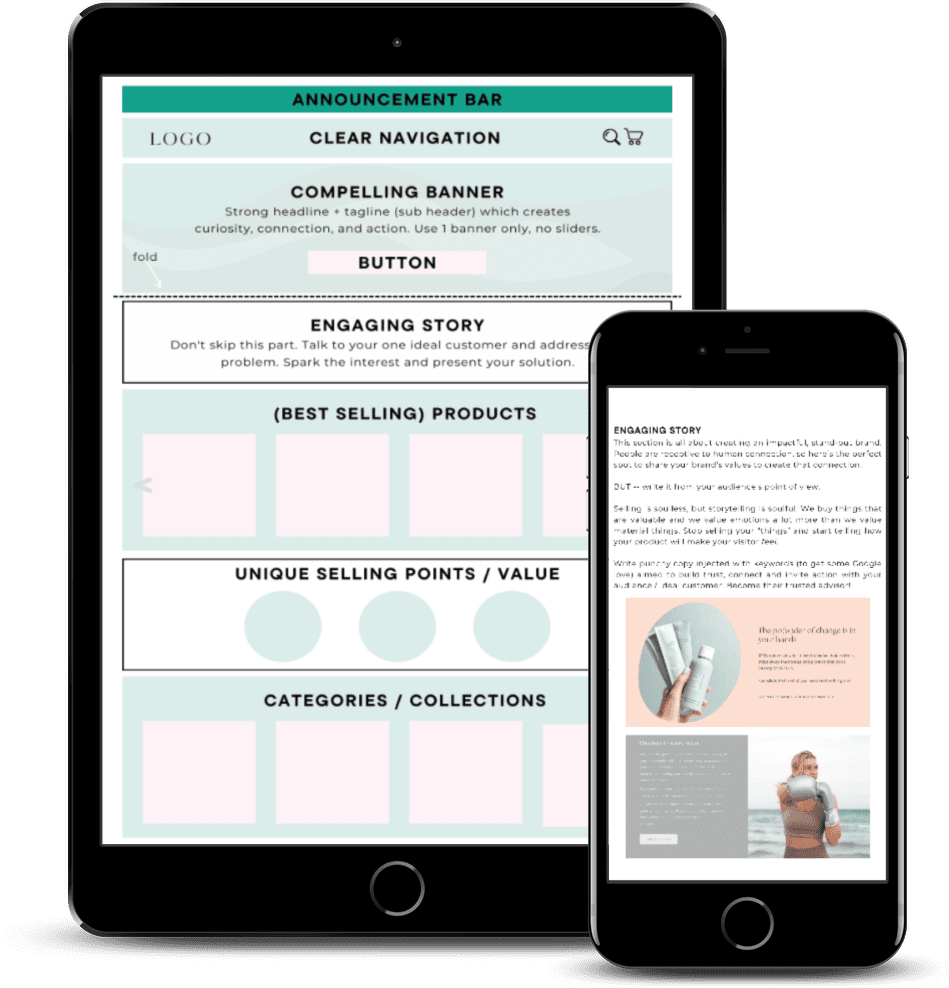
- Site Architecture
All our builds come with designs of these pages:
- Homepage
- Product pages
- Collection / Category pages
- Checkout page
- Cart page
- Blog + blog post page
- Account page (customer login)
- 404 error page (page not found)
- Policy pages (Terms & Conditions, Privacy Policy, Shipping & Refund pages)
- About Page
- Contact Page
Some of our packages come with extra pages (FAQ, Sizing, etc.) Please check if your store requires any of these pages. If they fall outside of your package, extra charges will apply.
Step 5
Content
- Documents with copy for your pages
Include headlines, sub headlines, call-to-actions (buttons) and blurbs for your Homepage. Ideally you should aim for 300 words on your homepage in total for optimal SEO purposes. Add copy for the About page and any other pages in this doc as well. SEO tip: include longtail keyword placements for Collection pages as well.
We do offer Copywriting Services or we can highly recommend working with another professional copywriter. When DIYing, download our Copy Guide here and make usage of ChatGPT and Copysmith.ai.
- Documents with your product descriptions
Include a title, description (ideally including keywords and at least 120-150 words), price and code/SKU (optional). If you have variants, please add them too (colour, size, etc.). Shopify allows up to 3 variants, if you go over this, you’ll need to integrate a (paid) app such as Infinite Options.
- Images
Banner images:
HORIZONTAL (not vertical) and a minimum of 1500 pixels wide and a maximum of 3000 pixels wide.
Product images:
Ideally square and min. 1080 x 1080 pixels or max. 2500 x 2500 pixels and named correctly so we can identify them.
- Use PNG & JPG files
- Ensure your images are compressed and ready to be uploaded < 1MB (500-900kb is perfect)
Banner images or videos should align with your brand and reinforce that the visitor is in the right place.
A good idea is to use visuals that either show your product in use. You can also use a video or choose stock imagery from pexels.com (free) or iStock.com (paid)
- Any icons you like to use
ideally in 100×100 pixels in PNG or JPG file. You can use icon libraries such as Google Icons, Streamline Icons or via iStock. We can also custom design icons for you.
- Contact info
A standard contact form will be added, or add more info:
- Phone number
- Standard response times
- Map location and/or street address
- Additional information about your hours/premises etc
- License numbers (if applicable)
- Calendar / scheduler link
- Social proof / testimonials
- Policy pages
- Privacy Policy
- Terms of Service/Use
- Shipping Policy
- Refunds & Returns Policy
- Cookies Notification
You can check what your website needs via legal123.com.au or download templates from Termageddon.
We cannot provide you with legal advice and highly recommend involving a professional lawyer.
Shopify also offers free templates for the Privacy & Terms of Use.
Step 5
Tech stuff
- Google Search Console
We’ll inform Google that your website exists. Setup your Search Console account and we will submit your sitemap after going live.
It will give you a TXT record to add to your DNS records in your registrar (ie. GoDaddy) account. This will verify the website and give you access to the Search Console.
- Other scripts
Any other scripts you would like installed (such as live chat, review sites, GTM, email marketing tracking codes etc)

don't forget
Add-ons
Klaviyo is the most powerful Shopify addition. Our setup starts from $199 and flow creations from $399.
Leave it up to the professionals to write enchanting copy that persuades your visitor to take action. Our pricing starts from $99 per page (or email) to $79 for product descriptions.
- Photography
High res images really make a difference for both products and services. We highly recommend working with professional photographers such as Helen Koker, Twinewood Studio, YAWP studio or use stock images, from Pexels, iStock or Haute Stock.
An expert who can create magic with keywords is a worthwhile investment so your website ranks higher in search engines. Our pricing starts from $499.
Claim your Google My Business and set up your Analytics account. You can also dab into Google Ads. Make sure to download our Become BBFs with Google Guide to learn more about the power of Google and how it works for your website.
Safeguard your business against online risks with this protection against cyber-attacks, such as computer hacking, ransomware or data theft. You can get a quote via BizCover (and if you wish to mention my name, Siri Buskes, I will get a little referral bonus ❤️).
Rather leave it up to the professionals?
Get in touch
It’s casual, it’s easy, and there are no strings attached. We are always here to help and give you honest advice. Sooo, what are you waiting for?!